Install PostgreSQL, PostGIS and OpenGeo on Ubuntu 14.04


Actually to install PostgreSQL, PostGIS and OpenGeo we can follow http://suite.opengeo.org/docs/latest/intro/installation/ubuntu/install.html#intro-installation-ubuntu-install.

wget -qO- http://apt.boundlessgeo.com/gpg.key | sudo apt-key add -
echo "deb http://apt.boundlessgeo.com/suite/v45/ubuntu/ trusty main" | sudo tee -a /etc/apt/sources.list.d/opengeo.list
sudo apt-get update
sudo apt-get install opengeo

Fixing libgdal1 Error

Unfortunately, I got an error:

Reading package lists... Done
Building dependency tree 
Reading state information... Done
The following packages were automatically installed and are no longer required:
 libarmadillo4 libarpack2 libbcmail-java libbcpkix-java libboost-thread1.54.0
 libcgal10 libcommons-jexl-java libcommons-lang3-java libdap11 libdapclient3
 libepsilon1 libexcalibur-logger-java libfreexl1 libgdal1h
 libgeronimo-javamail-1.4-spec-java libgeronimo-jms-1.1-spec-java
 libhdf4-0-alt libhdf5-7 libhtmlparser-java libhttpmime-java libjcharts-java
 libjtidy-java libkml0 liblwgeom-2.1.2 liblwgeom-2.1.6 libnetcdfc7 libodbc1
 libogdi3.2 libossp-uuid16 libspatialite5 liburiparser1 libxerces-c3.1
 libxstream-java linux-headers-3.13.0-32 linux-headers-3.13.0-32-generic
 linux-image-3.13.0-32-generic linux-image-extra-3.13.0-32-generic
Use 'apt-get autoremove' to remove them.
The following extra packages will be installed:
 libgdal opengeo-client opengeo-dashboard opengeo-docs opengeo-server
 opengeo-tomcat7 pgdg-keyring postgis-2.1 postgresql-9.3
 postgresql-9.3-postgis-2.1 postgresql-client-9.3 postgresql-client-common
 postgresql-common
Suggested packages:
 oidentd ident-server locales-all postgresql-doc-9.3
The following NEW packages will be installed:
 libgdal opengeo opengeo-client opengeo-dashboard opengeo-docs opengeo-server
 opengeo-tomcat7 pgdg-keyring postgis-2.1 postgresql-9.3
 postgresql-9.3-postgis-2.1 postgresql-client-9.3 postgresql-client-common
 postgresql-common
0 upgraded, 14 newly installed, 0 to remove and 109 not upgraded.
Need to get 82.6 MB of archives.
After this operation, 222 MB of additional disk space will be used.
...
Preparing to unpack .../libgdal_1.11.1-1+opengeo_amd64.deb ...
Unpacking libgdal (1.11.1-1+opengeo) ...
dpkg: error processing archive /var/cache/apt/archives/libgdal_1.11.1-1+opengeo_amd64.deb (--unpack):
 trying to overwrite '/usr/lib/libgdal.so.1', which is also in package libgdal1h 1.10.1+dfsg-5ubuntu1
Selecting previously unselected package postgis-2.1.
...
Errors were encountered while processing:
 /var/cache/apt/archives/libgdal_1.11.1-1+opengeo_amd64.deb
E: Sub-process /usr/bin/dpkg returned an error code (1)

The error caused by libgdal1 has duplicate item with different name libgdal1h. So, to fix the error, we can run the following commands:

sudo dpkg -P libgdal1h
sudo apt-get -f install

Voila! Our PostgreSQL, PostGIS and OpenGeo are ready on our machine.

Bonus: Activate PostGIS Shapefile and DBF loader

To access PostGIS Shapefile and DBF loader menu in pgAdmin III, we can edit /usr/share/pgadmin3/plugins.d/plugins.ini file by adding the following lines:

;
; pgShapeLoader (Linux):
;
Title=PostGIS Shapefile and DBF loader
Command=$$PGBINDIR/shp2pgsql-gui -U $$USERNAME -d $$DATABASE -p $$PORT -h $$HOSTNAME
Description=Open a PostGIS ESRI Shapefile or Plain dbf loader console to the current database.
KeyFile=$$PGBINDIR/shp2pgsql-gui
Platform=unix
ServerType=postgresql
Database=Yes
SetPassword=No

APK being Cached after Uninstall App on Android Lollipop


Last time, I got a problem with Nexus 5 with Android Lollipop. I developed an application on the devices and tried uninstalled it. At this point, there was no problem, the app didn’t appear on launcher anymore. But, when I tried to install from Google Play Store, the download process was very fast. The app version was not Google Play Store version, but the developed version. I thought that *.apk was cached somewhere in the device.

Inspect App using ES File Explorer

I uninstalled the app once more. I ran ES File Explorer, open Homepage tab, and click APP.

com.example still appeared after uninstallation
com.example still appeared after I uninstalled it

I saw that our develop version still appear in that list. I tried to open it, but couldn’t. So I checked the Properties of the app. I see that the app already uninstalled.

com.example properties: uninstall button was  already disabled
com.example properties: uninstall button was already disabled

Solutions: Uninstall for all users

Android Lollipop on some devices can have multiple users. On Nexus 5, by default, there are two users (primary user and guest).

Multiple users on Android Lollipop

When an app is deployed (by developer) to the device, it will be installed on all users. So, to remove app from all users, in App infoclick on more menu (vertical ellipsis) and then Uninstall for all users.

Uninstall for all users option in App info action bar menu

After this, the app will be removed from your devices. If you reinstall from Google Play Store, it will download the store version.

Tutorial Creating OpenStack Instance in TryStack


OpenStack is an open-source software cloud computing platform. OpenStack is primarily used for deploying an infrastructure as a service (IaaS) solution like Amazon Web Service (AWS). In other words, you can make your own AWS by using OpenStack. If you want to try out OpenStack, TryStack is the easiest and free way to do it.

In order to try OpenStack in TryStack, you must register yourself by joining TryStack Facebook Group. The acceptance of group needs a couple days because it’s approved manually. After you have been accepted in the TryStack Group, you can log in TryStack.

Screenshot from 2016-05-12 20:04:39
TryStack.org Homepage

I assume that you already join to the Facebook Group and login to the dashboard. After you log in to the TryStack, you will see the Compute Dashboard like:

Screenshot from 2016-05-12 20:09:40

OpenStack Compute Dashboard

Overview: What we will do?

In this post, I will show you how to run an OpenStack instance. The instance will be accessible through the internet (have a public IP address). The final topology will like:


Screenshot from 2016-05-12 19:15:55
Network topology

As you see from the image above, the instance will be connected to a local network and the local network will be connected to internet.


Step 1: Create Network

Network? Yes, the network in here is our own local network. So, your instances will be not mixed up with the others. You can imagine this as your own LAN (Local Area Network) in the cloud.

  1. Go to Network > Networks and then click Create Network.
  2. In Network tab, fill Network Name for example internal and then click Next.
  3. In Subnet tab,
    1. Fill Network Address with appropriate CIDR, for example 192.168.1.0/24. Use private network CIDR block as the best practice.
    2. Select IP Version with appropriate IP version, in this case IPv4.
    3. Click Next.
  4. In Subnet Details tab, fill DNS Name Servers with 8.8.8.8 (Google DNS) and then click Create.

Step 2: Create Instance

Now, we will create an instance. The instance is a virtual machine in the cloud, like AWS EC2. You need the instance to connect to the network that we just created in the previous step.

  1. Go to Compute > Instances and then click Launch Instance.
  2. In Details tab,
    1. Fill Instance Name, for example Ubuntu 1.
    2. Select Flavor, for example m1.medium.
    3. Fill Instance Count with 1.
    4. Select Instance Boot Source with Boot from Image.
    5. Select Image Name with Ubuntu 14.04 amd64 (243.7 MB) if you want install Ubuntu 14.04 in your virtual machine.
  3. In Access & Security tab,
    1. Click [+] button of Key Pair to import key pair. This key pair is a public and private key that we will use to connect to the instance from our machine.
    2. In Import Key Pair dialog,
      1. Fill Key Pair Name with your machine name (for example Edward-Key).
      2. Fill Public Key with your SSH public key (usually is in ~/.ssh/id_rsa.pub). See description in Import Key Pair dialog box for more information. If you are using Windows, you can use Puttygen to generate key pair.
      3. Click Import key pair.
    3. In Security Groups, mark/check default.
  4. In Networking tab,
    1. In Selected Networks, select network that have been created in Step 1, for example internal.
  5. Click Launch.
  6. If you want to create multiple instances, you can repeat step 1-5. I created one more instance with instance name Ubuntu 2.

Step 3: Create Router

I guess you already know what router is. In the step 1, we created our network, but it is isolated. It doesn’t connect to the internet. To make our network has an internet connection, we need a router that running as the gateway to the internet.

  1. Go to Network > Routers and then click Create Router.
  2. Fill Router Name for example router1 and then click Create router.
  3. Click on your router name link, for example router1, Router Details page.
  4. Click Set Gateway button in upper right:
    1. Select External networks with external.
    2. Then OK.
  5. Click Add Interface button.
    1. Select Subnet with the network that you have been created in Step 1.
    2. Click Add interface.
  6. Go to Network > Network Topology. You will see the network topology. In the example, there are two network, i.e. external and internal, those are bridged by a router. There are instances those are joined to internal network.

Step 4: Configure Floating IP Address

Floating IP address is public IP address. It makes your instance is accessible from the internet. When you launch your instance, the instance will have a private network IP, but no public IP. In OpenStack, the public IPs is collected in a pool and managed by admin (in our case is TryStack). You need to request a public (floating) IP address to be assigned to your instance.

  1. Go to Compute > Instance.
  2. In one of your instances, click More > Associate Floating IP.
  3. In IP Address, click Plus [+].
  4. Select Pool to external and then click Allocate IP.
  5. Click Associate.
  6. Now you will get a public IP, e.g. 8.21.28.120, for your instance.

Step 5: Configure Access & Security

OpenStack has a feature like a firewall. It can whitelist/blacklist your in/out connection. It is called Security Group.

  1. Go to Compute > Access & Security and then open Security Groups tab.
  2. In default row, click Manage Rules.
  3. Click Add Rule, choose ALL ICMP rule to enable ping into your instance, and then click Add.
  4. Click Add Rule, choose HTTP rule to open HTTP port (port 80), and then click Add.
  5. Click Add Rule, choose SSH rule to open SSH port (port 22), and then click Add.
  6. You can open other ports by creating new rules.

Step 6: SSH to Your Instance

Now, you can SSH your instances to the floating IP address that you got in the step 4. If you are using Ubuntu image, the SSH user will be ubuntu.

Fixing adb “Device not found” with Nexus 5 devices in Recovery Mode


Yesterday (June 20th, 2014), Google announced Android 4.4.4 update for some Nexus devices, including Nexus 5. But, when I tried to manual install the OTA update by entering the device to recovery mode and install from adb sideload, there was a problem. My Nexus 5 device did not detect while in adb sideload mode.

adb: device not found

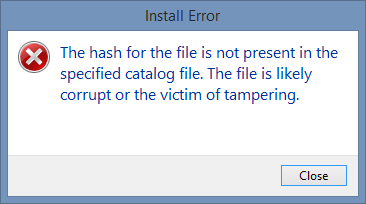
I followed this instruction Fixing adb “Device not found” with Nexus 7/Android devices in Recovery Mode on my Windows 8.1 machine and gave me this error:

Driver Install Error

Install Error: The hash for the file is not present in the specified catalog file. The file is likely corrupt or the victim of tampering.

If you have same problem with me, you can fix this error by following this step.

  1. Install original Google USB Driver.
  2. Open your Device Manager (Right click Windows Start logo > Device Manager).
  3. You will see Nexus 5 devices under Other devices group.
  4. Right click on Nexus 5, and then click Update Driver Software.
  5. Select Browse my computer for driver software.
  6. Click Let me pick from a list of device drivers on my computer.
  7. Choose Android Device and then Next.
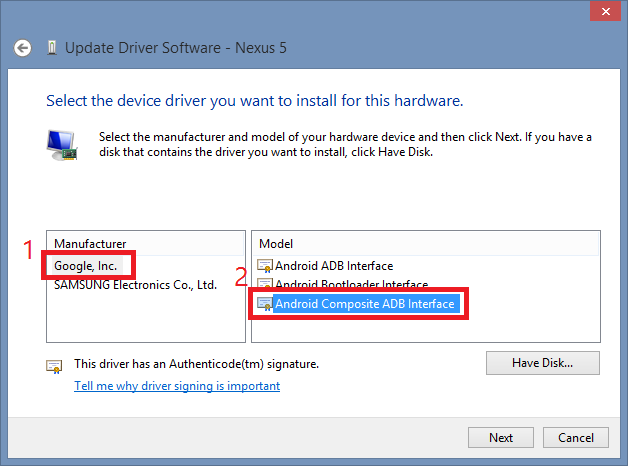
  8. Choose Manufacture: Google and then model: Android Composite ADB Interface.
    SNAG-0219

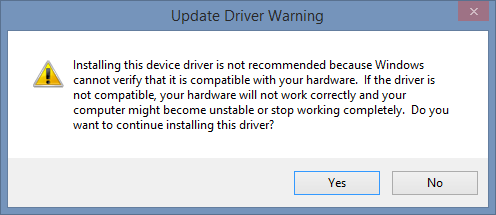
  9. Windows will warn you about incompatibility driver. You can just click Yes to continue the process.
    SNAG-0220

Now, your Nexus 5 driver will be detected in recovery mode, so you can continue your Nexus 5 OTA update.

SNAG-0221

Run VMware/VirtualBox and Hyper-V on Same Machine


Sometimes, you have to use VMware or VirtualBox, but you have Hyper-V installed on your machine (usually to develop Windows Phone application). VMware or VirtualBox can’t run side-by-side with Hyper-V. They have different type of Hypervisor.

If you want to run VMware/VirtualBox and Hyper-V on same machine (but not side-by-side), you can set-up your hypervisor launch options in BCD. Simply, open Administrator’s Command Prompt (Run as administrator) and then:

Disable Hypervisor Launch Options: to run VMware or VirtualBox

C:\WINDOWS\system32>bcdedit /set hypervisorlaunchtype off
The operation completed successfully.

OR

Enable Hypervisor Launch Options: to run Hyper-V

C:\WINDOWS\system32>bcdedit /set hypervisorlaunchtype auto
The operation completed successfully.

Don’t forget to reboot your machine. And voilà: you can use Hypervisors that you want.

Change Microsoft Excel Workbook Default Font Forcibly


Microsoft Excel gives an option to change the default font for the new workbooks created after (check here), but it does not effect to the current workbook.

If you have an Excel workbook that you want to change the default font, you can manually select all cells and change the font you want. But, if you create new worksheets, the font will be the old one.

Microsoft Office Open XML Workbook (*.xlsx), the default file type in Microsoft Office Excel 2007 and above, actually is an zip document with extension *.xlsx extension. The file contains many files (most of *.xml) that representing spreadsheets. (see here)

Fortunately, because of the file format, we can change the default font forcibly. You can follow the instruction bellow (assume: you familiar with XML file).

Image

  1. Save and close your Excel (*.xlsx) workbook.
  2. Using compression tool (like 7zip, WinRAR, etc.) to extract the *.xlsx file.
    If you use 7zip, you can right click on your *.xlsx file in Windows Explorer, and then select 7-Zip | Extract files….
  3. Open the directory where the file has just been extracted.
  4. Go to xl directory, and open styles.xml files using your text editor.

    ChangeFontExcel-2

  5. Find the <fonts> tags. You will be find there is an (maybe more than one)  <font> tags.
    <?xml version="1.0" encoding="UTF-8" standalone="yes"?>
    <styleSheet xmlns="http://schemas.openxmlformats.org/spreadsheetml/2006/main" xmlns:mc="http://schemas.openxmlformats.org/markup-compatibility/2006" mc:Ignorable="x14ac" xmlns:x14ac="http://schemas.microsoft.com/office/spreadsheetml/2009/9/ac">
        <fonts count="1" x14ac:knownFonts="1">
            <font>
                <sz val="14" />
                <color theme="1" />
                <name val="Arial" />
                <family val="2" />
            </font>
    	<!-- other fonts -->
        </fonts>
        <!-- other style parameters -->
    </styleSheet>
    
  6. You can edit the value of <name /> and <sz /> tags for font name and size.
  7. Save the styles.xml.
  8. Compress the directory to zip file format, and rename the file extension to *.xlsx.

ChangeFontExcel-7

Your Excel workbook’s default font will be changed.